GST Registration Decoded
>> Introduction:
Good day, champs! This blog will walk you through the entire GST registration process, focusing on the practical, step-by-step approach to help you clearly understand how GST registration is done from start to finish.
>>What’s it all?
The Ministry of Finance has made GST registration simple and completely online through the GST Portal. Applicants can easily submit their registration application, after which a GST Application Reference Number (ARN) is generated instantly. This ARN helps track the application status and respond to any queries raised by the department. Within 7 days of ARN generation, eligible applicants receive their GSTIN and GST Registration Certificate. This guide walks you through the GST registration process step by step in a clear and hassle-free manner.

>>To Begin with : 1. Access the GST Portal ->/ > Services -> Registration > New Registration option.

2.On the GST Portal, choose New Registration to begin the process. If the application is left incomplete, you can resume it anytime using the Temporary Reference Number (TRN). Select the appropriate taxpayer type and state, then enter the legal name of the business exactly as per the PAN records, as the portal auto-verifies PAN details. Provide the relevant PAN (business/proprietor/company/LLP, as applicable) since GST registration is PAN-linked. Finally, enter the email ID of the Primary Authorised Signatory for verification and click Proceed to move ahead.
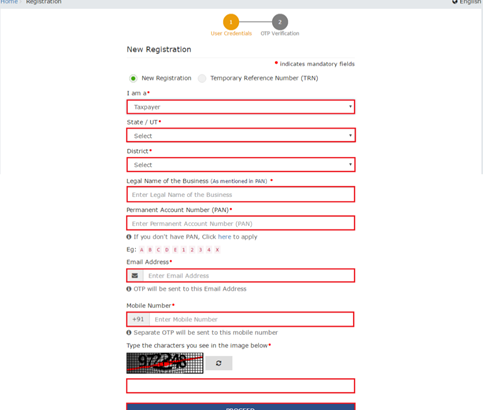
3. Once the details are submitted, the OTP Verification screen appears. Two separate OTPs—one for mobile and one for email—will be sent and are valid for 10 minutes only. Enter the respective OTPs in the Mobile OTP and Email OTP fields to verify your contact details and proceed further.

4. On completing OTP verification, a TRN will be generated. TRN will now be used to complete and submit the GST registration application.
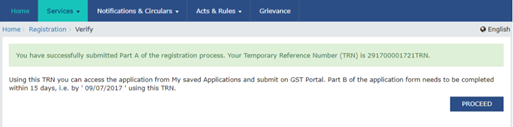
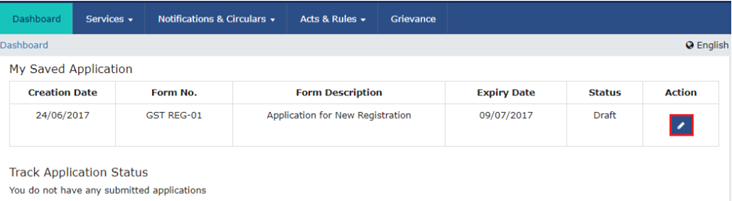
5. Once the Temporary Reference Number (TRN) is generated, the GST registration process can be resumed on the GST Portal. Enter the TRN in the designated field, fill in the captcha as displayed, and proceed further. Complete the OTP verification for both mobile number and email ID to securely continue with your GST registration.
>> Click on the icon marked in red to start the process of GST registration.
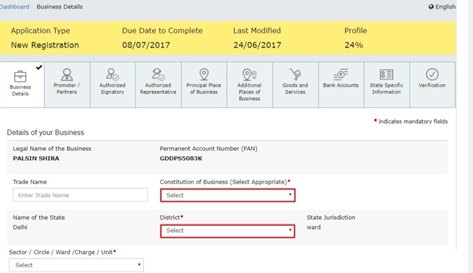
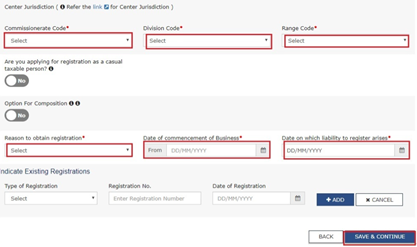
6. To proceed smoothly with GST registration, applicants must first complete the Business Details tab. Enter the trade name, select the constitution of the business, and choose the appropriate district and jurisdiction details including Commissionerate, Division, and Range codes. If applicable, opt for the Composition Scheme. Provide the date of commencement of business and specify the date when GST liability arises—that is, when the business crosses the prescribed turnover limit. Remember, GST registration must be applied for within 30 days from the date the liability arises.
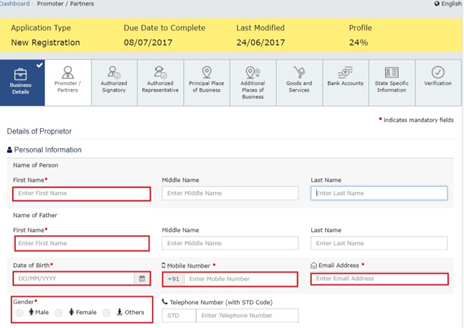
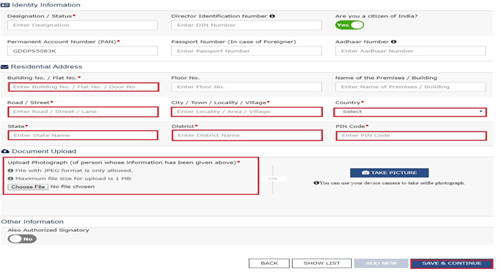
7. Next,in the Promoters / Directors tab, applicants must furnish details of the key stakeholders. For proprietorships, the proprietor’s details are required. The GST portal allows submission of details for up to 10 promoters or partners. Information such as personal details (name, DOB, address, contact details, gender), designation, citizenship, PAN and Aadhaar, and residential address must be provided. For specified entities like companies and PSUs, the Director Identification Number (DIN) is mandatory. Applicants who submit Aadhaar can conveniently use Aadhaar e-sign for GST filings instead of a digital signature.
8. An authorised signatory is a person nominated by the promoters of the company. The nominated person shall hold responsibility for filing GST returns of the company. Further, the person shall also maintain the necessary compliance of the company. The authorised signatory will have full access to the GST Portal. The person shall undertake a wide range of transactions on behalf of the promoters.
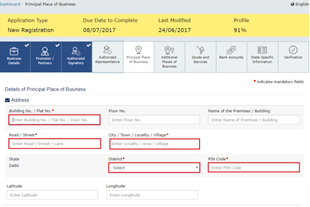
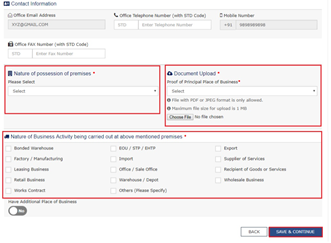
9. In the Principal Place of Business section, applicants must provide details of the primary location where the business operates and maintains its books of accounts. For companies and LLPs, this is typically the registered office. Enter the complete business address, official contact details (email, phone, mobile, fax), and specify the nature of possession of the premises.
If the premises fall under an SEZ or the applicant is an SEZ developer, upload the relevant government-issued approvals. Supporting documents must also be uploaded as proof of ownership or occupancy—whether the premises are owned, rented/leased, or shared—such as property tax receipts, electricity bills, municipal records, rent agreements, or consent letters, as applicable.
10.Upon having an additional place of business, enter the details of the property in this tab. For instance, if the applicant is a seller on Flipkart or another e-commerce portal and uses the seller's warehouse, that location can be added as an additional place of business.
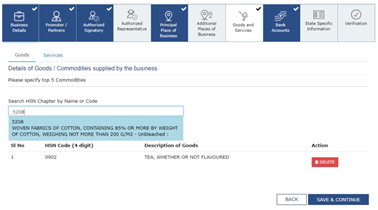
goods and services supplied by the applicant. For goods supplied, provide the HSN code, and for services, provide the SAC code.
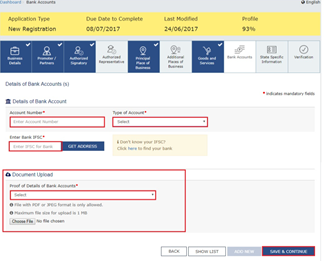
12. In this section, enter the number of bank accounts held by the applicant. If there are 5 accounts, enter 5. Then provide details of the bank account like account number, IFSC code and type of account. Finally, upload a copy of the bank statement or passbook in the place provided.
13. In this step, verify the details submitted in the application before submission. Once verification is complete, select the verification checkbox. In the Name of Authorised Signatory drop-down list, select the name of the authorised signatory. Enter the place where the form is filled. Finally, digitally sign the application using a Digital Signature Certificate (DSC)/ E-Signature or EVC. Digitally signing using DSC is mandatory in the case of LLPs and Companies.
14. On signing the application, the success message is displayed. The acknowledgement shall be received in the registered e-mail address and mobile phone number. The Application Reference Number (ARN) receipt is sent to the e-mail address and mobile phone number. Using the GST ARN Number, the status of the application can be tracked. This 14-step process can help you with how to do GST registration.

Thanks for your patient reading champs. Do follow @CALijilLakshman and @Taxschool.in for more updates.
Written by,
Narayana Veera Simhan S
Mentor-Taxschool